Setting up a virtual host on Ubuntu
The following document, explains how we can configure a virtual host for any site on Ubuntu, you just need to follow these steps sequentially.
1- Create the directory.
We need to have a directory to contain the site files, if you already have a directory created you can use it, but it’s important that it is located on /var/www/, so, we can create a new directory with this command:
sudo mkdir /var/www/example.com
2- Create the test html file.
In this case, we’re going to create a html file just to test. You can do it running the following commands:
sudo nano /var/www/example.com/index.html
Then you can add any html code there.
3- Create the virtual host file.
This is a file to configure the virtual host parameter, to do that you can copy the default file configuration and then update it as you need for your site.
sudo cp /etc/apache2/sites-available/000-default.conf /etc/apache2/sites-available/example.com.conf
You can edit it with:
sudo nano /etc/apache2/sites-available/example.com.conf
The file should have a configuration like this:
<VirtualHost *:80>
ServerAdmin webmaster@localhost
DocumentRoot /var/www/example.com
ServerName example.com
ServerAlias www.example.com
ErrorLog ${APACHE_LOG_DIR}/error.log
CustomLog ${APACHE_LOG_DIR}/access.log combined
</VirtualHost>
You only need to update it as you want for your site, the “DocumentRoot” is where is located the site that you want to load.
4- Enable the virtual host.
Finally, we must enable it and restart the apache server using the this:
sudo a2ensite example.com.conf
service apache2 reload
5- Update the local host file.
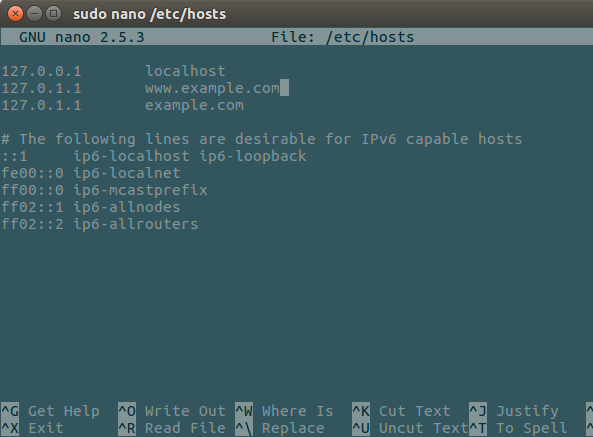
Use this command to edit the local host file to add the public IP address of your VPS server followed by the domain you want to use to reach that VPS.
sudo nano /etc/hosts
For this example would looks like this:

- WRITTEN BY:Mauricio Navarro
- POSTED ON:3/2/2018
- TAGS:Drupal
